
There is a very specific, universal disappointment that happens when you witness something incredibly beautiful in real life, pull out your smartphone to capture it, and look at a photograph that is completely flat, dull, and lifeless.
Maybe you were standing on a beach watching a breathtaking, vibrant pink sunset. But when you look at your camera roll, the sky looks muddy, the foreground is entirely pitch-black, and the magic of the moment is completely gone.
For years, my solution to this problem was incredibly lazy. I would just open the photo in Instagram, slap a heavy, predefined filter on it, and call it a day. I let the software blanket my memory in artificial contrast. It made the colors pop, sure, but it also made the photo look completely fake. My skin would look orange, the grass would look neon green, and the shadows would be crushed into oblivion.
I thought that unless I bought a three-thousand-dollar DSLR camera and learned how to use professional desktop software, my smartphone photos were always going to look amateurish.
I was completely wrong.
The photo editing applications we already have installed on our phones—whether it is the native Apple Photos app, Google Photos, or free powerhouses like Snapseed and Lightroom Mobile—contain algorithms that rival professional studios. The problem isn’t the camera; the problem is that we ignore the hidden sliders and advanced tools buried just beneath the crop button.
I spent a few weeks abandoning the default filters and digging into the manual editing suites hidden on my phone. What I found was a complete revelation. If you are tired of your memories looking flat and uninspired, here are the hidden editing features in photo apps that will improve your pictures instantly.
1. Stop Using “Brightness” and Start Using “Brilliance”
When a photo is too dark, our immediate instinct is to grab the “Brightness” slider and drag it to the right.
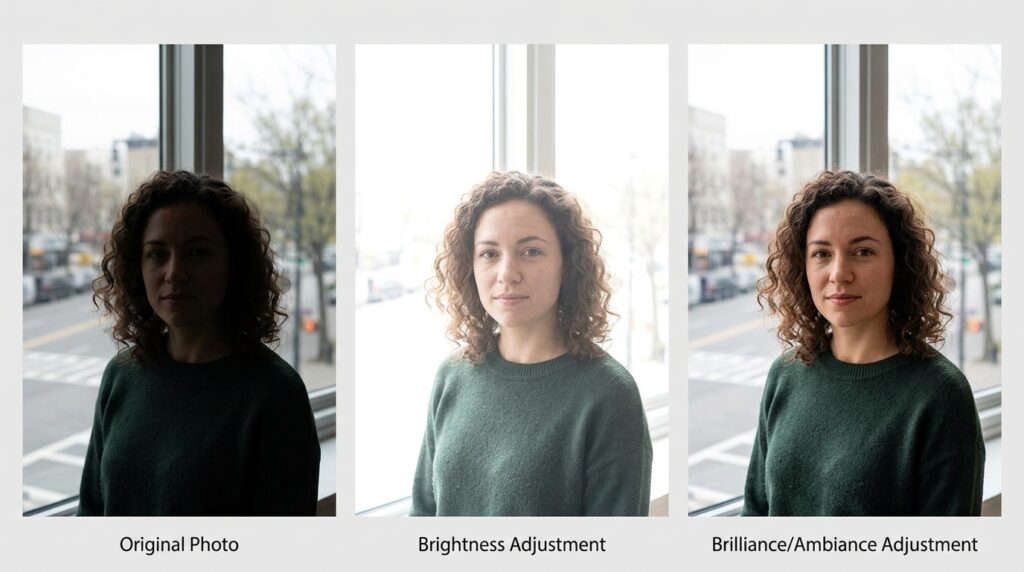
This is almost always a mistake. The Brightness slider is a blunt instrument. It takes every single pixel in the photograph—the dark shadows, the mid-tones, and the bright highlights—and blindly makes them all lighter. If you do this to a photo of a person standing in front of a window, you might make their face visible, but you will completely blow out the window behind them into a blinding white glare.
Instead, look for the hidden slider labeled Brilliance (in Apple Photos) or Ambiance (in Snapseed).
These are intelligent, algorithmic sliders. When you increase the Brilliance, the software analyzes the dynamic range of the image. It selectively lifts the dark shadows to reveal hidden details, but it simultaneously protects the bright highlights from blowing out. It adds localized contrast, making the image look richer and more vibrant without washing out the entire frame.
It is the closest thing to a magic “make this photo look better” button that exists, and it completely changed my baseline workflow.
2. The Lifesaver of the Backlit Subject: Selective Masking
We have all taken the dreaded backlit photo. You take a picture of a friend with the sun behind them, and they turn into a completely anonymous, dark silhouette.
In the past, you either deleted the photo or ruined the entire background trying to brighten their face. But modern photo apps feature incredibly powerful tools called Selective Adjustments or Masking.
In Snapseed, there is a tool literally called “Selective.” You tap the icon, and then tap directly on your friend’s dark face. The app drops a tiny control point. You can pinch your fingers to adjust the radius of the circle so it only covers their face and body. Then, you simply swipe to the right to increase the brightness.
The software magically illuminates the subject while leaving the beautiful sunset behind them completely untouched.
In Lightroom Mobile, the AI takes this even further. You can tap the “Masking” tool and select “Select Subject.” The AI will automatically trace the outline of the person in the photo with terrifying accuracy, allowing you to edit them completely independently of the background. Mastering this localized control was a massive breakthrough for me, a concept I elaborated on heavily when writing about How to Edit Photos Like a Pro on Your Phone. Once you learn to edit the subject and the background separately, your photos instantly look professional.
3. Fixing the Falling Buildings (Perspective Correction)
Have you ever stood in front of a magnificent, towering piece of architecture—like a cathedral or a skyscraper—and taken a photo, only to realize later that the building looks like it is leaning backward and falling away from you?
This optical illusion is called “converging verticals.” It happens because you have to tilt your smartphone camera upward to fit the tall building into the frame.
Most people just accept that architecture photos taken on a phone look slightly warped. But there is a hidden geometry tool designed specifically to fix this.
In Apple Photos, crop your image, tap the vertical or horizontal alignment tools, and manually drag the sliders. But the absolute king of this feature is the Perspective tool in Snapseed.
When you open the Perspective tool, you can physically drag the corners of your photo. If you drag the top corners outward, the app artificially tilts the building forward, straightening the converging lines. Even more impressively, if you tilt the photo so much that it leaves blank black spaces at the edges of the frame, Snapseed’s “Smart Fill” algorithm will literally generate new pixels—cloning the sky or the pavement—to fill in the gaps seamlessly. Fixing the geometry of your photos makes them look incredibly grounded and professional.
4. Taming the Radioactive Grass with HSL Sliders
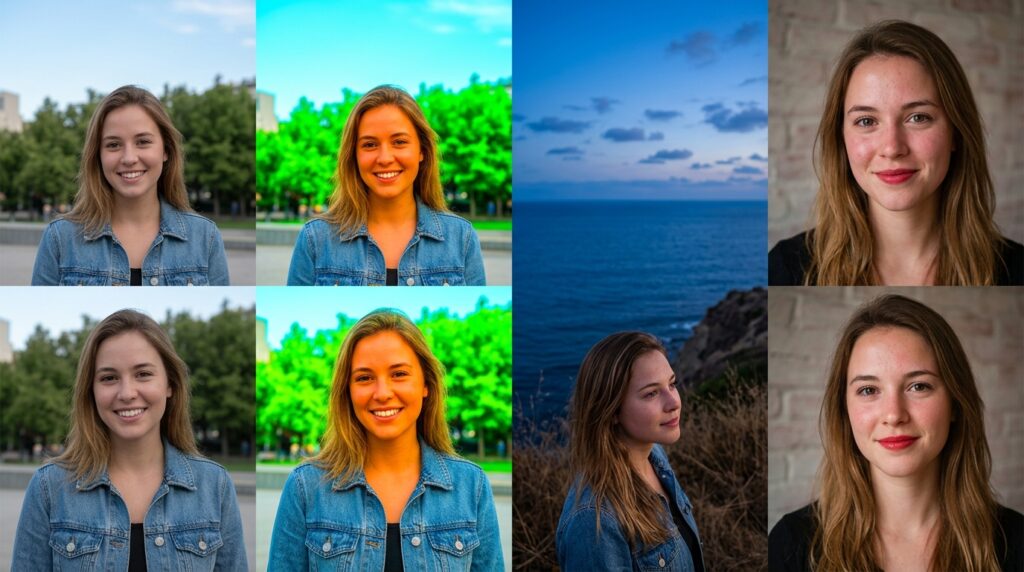
One of the main reasons default filters look terrible is because they apply saturation globally. If you want the blue sky to look a little richer, you turn up the saturation. But as a result, the grass turns neon green, and your friend’s skin tone turns a radioactive shade of orange.
You cannot edit all colors identically. You need to use the HSL (Hue, Saturation, Luminance) Sliders.
In apps like Lightroom Mobile, you will find a “Color Mix” tool. Instead of one master saturation slider, you are presented with eight individual color circles (Red, Orange, Yellow, Green, Blue, etc.).
If the sky in your photo looks a bit dull, you tap the Blue circle. You can increase the saturation of the blues, and darken the luminance (brightness) of the blues, making the sky look like a deep, rich sapphire. Because you only selected the blue channel, the green grass and the orange skin tones are left entirely untouched.
Skin tones are primarily made up of orange and red hues. If a photo makes someone look a bit too flushed or sunburned, I simply select the Orange slider, pull the saturation down slightly, and raise the luminance to brighten their face. Having this level of granular control completely revolutionized my editing process, a journey I detailed in The Photography App That Took My Pictures From Good to Amazing. Color grading is the secret sauce that separates amateurs from professionals.
5. Erasing the Tourists: The Healing Brush
Taking a pristine, empty photo of a famous landmark is practically impossible. You can wait twenty minutes for a crowd to part at a national monument, and the exact second you press the shutter button, a guy in a bright neon shirt will inevitably wander into the background of your frame.
It ruins the entire aesthetic of the shot.
However, you no longer need complex desktop cloning software to remove photo-bombers. You can do it with a simple swipe of your finger.
Google Photos features a tool called Magic Eraser, and Snapseed has a tool called Healing.
If you have a beautiful photo of a beach with a random trash can in the corner, you simply open the Healing tool, zoom in closely on the trash can, and paint over it with your finger. The moment you lift your finger, the software analyzes the surrounding pixels—the sand, the water, the texture of the beach—and instantly replaces the trash can with a perfectly matched patch of background.
It is genuine digital magic. You can use it to remove power lines crisscrossing a sunset, blemishes on a portrait, or distant tourists ruining a landscape.
6. Adjusting Depth of Field After the Fact
Portrait Mode is one of the greatest technological advancements in modern smartphone photography. By using multiple lenses and depth sensors, our phones can artificially blur the background of a photo, creating that creamy, cinematic “bokeh” effect that used to require a massive, expensive camera lens.
But sometimes, the software gets it wrong. Sometimes the blur is way too intense, making the photo look incredibly fake. Other times, the edge detection is slightly off, and a piece of your hair gets blurred into the background.
What most people don’t realize is that the Portrait Mode blur is not permanently baked into the photo. It is adjustable after you take the shot.
If you open a Portrait Mode photo in your native Apple or Google Photos app and tap “Edit,” you will see a slider labeled with an “f” (for f-stop or aperture).
If you drag this slider to the right (like f/16), the background blur completely disappears, bringing the entire environment into sharp focus. If you drag it to the left (like f/1.4), the background completely melts into a deep, intense blur.
You have total control over the depth of field. I frequently pull the blur back just a little bit. It makes the artificial depth look much more natural and forgiving, completely hiding the fact that the photo was shot on a smartphone.
7. The Ultimate Time Saver: Copy and Paste Edits
Let’s say you go to a friend’s birthday party at a dimly lit restaurant. You take thirty photos throughout the night. They are all a bit dark, the colors are a bit yellow from the overhead lights, and they all need editing.
You spend five minutes meticulously adjusting the brilliance, fixing the shadows, tweaking the color temperature, and pulling down the highlights on the very first photo until it looks absolutely perfect.
The thought of manually repeating that exact same five-minute editing process on the other twenty-nine photos is exhausting.
You don’t have to. You can batch edit.
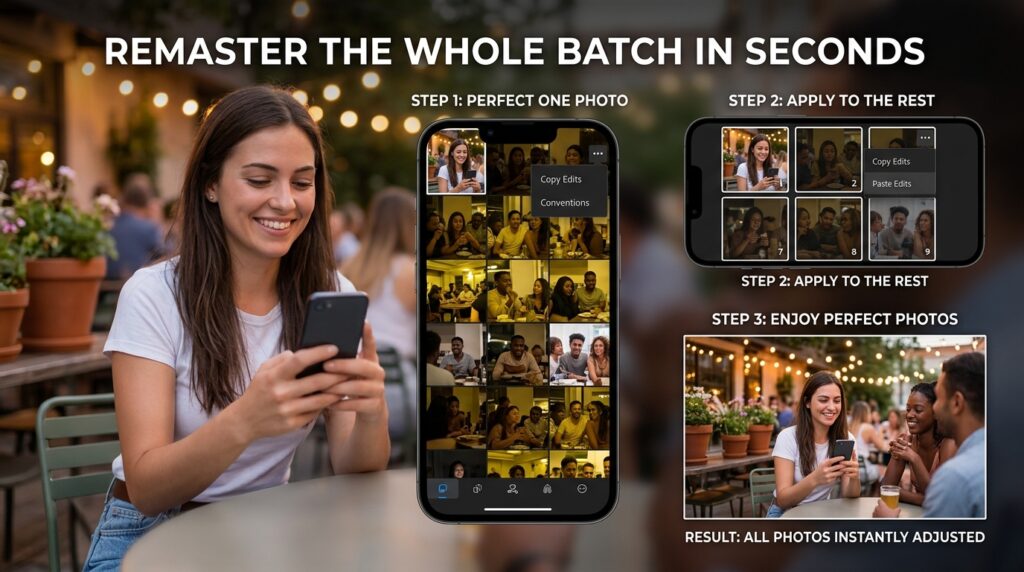
In almost every major photo application—including the native iOS photos app and Lightroom—once you finish editing a photo, you can tap the three dots in the top right corner and select “Copy Edits.”
You can then select all twenty-nine of the remaining photos in your grid, tap the menu again, and select “Paste Edits.” The software will instantly apply your exact custom slider adjustments, color corrections, and lighting fixes to every single photo simultaneously.
It turns a two-hour editing chore into a five-second victory. Keeping these massive batches of perfectly edited photos safe requires a solid backup strategy, which pairs perfectly with the systems I discussed in 12 Photo Storage Apps That Keep My Memories Safe. By automating the repetitive parts of the editing process, you free yourself up to actually enjoy the memories you captured.
Final Thoughts:
There is a massive misconception that editing a photo means faking it. We are culturally obsessed with “No Filter” tags, believing that a raw, unedited smartphone photo is the only true representation of reality.
But a smartphone camera is just a tiny, imperfect sensor. It often fails to capture the dynamic range, the rich colors, and the precise lighting that your human eye actually saw in the moment.
Editing is not about deceiving people; it is about restoring the image to match the memory.
When you learn to use these hidden tools—when you master selective masking, correct the geometric perspective, dial in the HSL sliders, and adjust the depth of field—you stop accepting the flat, compressed assumptions of the camera lens. You take creative control over the final product.
Take ten minutes tonight to scroll back to a photo you loved in the moment but hated on the screen. Open your native editing suite, ignore the default filters, and start playing with the advanced sliders. You will be absolutely astonished at the masterpiece hiding just beneath the surface of the pixels.
